
The world of photography can be overwhelming, especially to someone just beginning! I’ve written out some tips and pointers that I always suggest to digital and film newcomers.
What Does ISO Mean?
ISO – the number that’s shown on film canisters/boxes (often between 100-800) is the light sensitivity of the film. The higher the number, the more sensitive the film is to light. 100 ISO film is for daylight shooting only, and 800 ISO film is great for shooting at night/lowlight. Kodak Ultramax, one of the most popular films on the market, is rated at 400 ISO. This means that it can work for during the day, but also at night if used with a flash. Kodak Ultramax is a good middle ground for beginners, since it has beautiful tones and grain and is very forgiving. This diagram shows what ISO is suitable for where, and it transfers over to digital photography.
Digital photography ISO is very similar to film, except you’re able to change it with each shot. The higher the ISO is (the bigger the number), the more sensitive it is to the light present. But the higher the ISO is, there will also be more noise/grain (grain for film, noise for digital). It depends on the look you’re going for, but generally noise in digital photos is not loved!
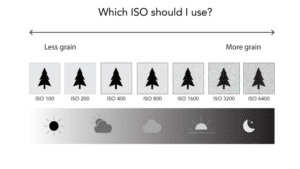
Photo credit: For All Things Creative
Aperture
Aperture is the amount of light that is being let into the camera through the lens. Lenses will have a ring on them with various numbers, like 2.8, 4, 5.6, 8, 11, 16, 22. These are all fractions of light that is being let in and exposed on the film. Aperture is controlled with the ring on the lens with the numbers mentioned above, and aperture blades open and close depending on the number fraction that they are on.
Aperture is like our eye’s pupil; the bigger it is, the more light that is being let in. But the larger the aperture is, the smaller number that is used to represent it. Aperture 2.8 (often written as “F Stop” or “f/2.8”) is “wide open”, where the aperture blades aren’t covering much of the lens’ inner elements at all. Whereas on f/22, only a tiny pinprick of light is being let in through the aperture blades since they are largely closed. Aperture on a lot of point and shoot cameras is “fixed”, meaning that it can’t be changed. On cameras with interchangeable lenses, aperture is not fixed.
When lenses have their aperture “wide open”, this creates the cinematic out-of-focus background that a lot of people strive for. This is also why lenses with a smaller F Stop, like f/1.4, are more expensive as they have this cinematic look. It’s very popular with portraits, and any photographs of people where the background is largely out of focus, these are often shot on lenses with a “fast” aperture (“fast” referring to the number, like f/1.4 or f/1.8).
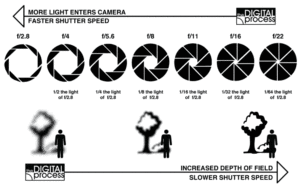
Photo credit: The Digital Process
This diagram from The Digital Process shows it very well, where faster aperture speeds have a look suitable for portraits, where slower aperture speeds (like f/16 and more) are good for landscapes because everything is in focus.
Shutter Speeds
Shutter speed is how fast the shutter itself is opening to create the photo. It’s a fraction of a second where light is let through the shutter, and imprinting an image on a section of the film roll/the digital sensor. The smaller the fraction of a second the shutter speed is (like 1/500th of a second), the sharper the subject will be and there won’t be any motion blur. Whereas if you shot 1/60th of a second, there would be lots of motion blur. This diagram from Adobe shows the differences in some common shutter speeds:
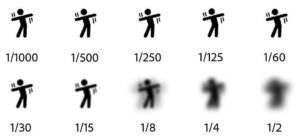
Photo credit: Adobe
But the other side of shutter speeds is that it needs to be balanced with both aperture and ISO, as the slower the shutter speed is, the more light that is being let in, and it could overexpose the image or even make it look blank. These 3 settings need to work together to create a beautiful image, and the understanding and intuition with these settings comes with time. It’s known as the Exposure Triangle.
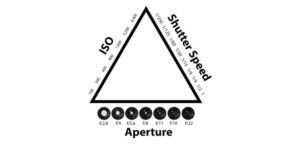
Photo credit: Photography Life
These can all be checked using a light meter. These are available as their own separate devices or can be downloaded on a smartphone (which is what I use!). SLR film cameras often have needle light meters too, but having an app shows it more in detail.
Understanding how all of these settings work in tandem comes from practice and shooting in a multitude of different environments, so enjoy your new camera and what you have to learn with it!


